没有耐心的人不可能成为出色的谈判代表
80%无价值的事物妨碍去发现20%有价值的事物
作为80/20思维者,我们不急于采取行动,而是先静心思考,领悟出一些东西后再采取针对性的行动。
一个人一生中最重要的决定之一就是选择盟友
可以说单打独斗将一事无成
减少行动,多思考
付出不一定有回报
如果你放弃一些低价值的活动,你就一定能把时间花在高价值的活动上
Blog
-
80 20原则读书笔记
-
命令行访问memcached
有很多的web端和GUI可以访问到Memcached服务,比如phpMemCacheAdmin,但是有些时候需要在命令行进行Memcached的访问。 在本教程中使用Telnet来攻取Memcached信息,以及如何读取与删除数据。 连接
telnet localhost 11211
获取服务信息,如pid, uptime, version, 条目数, 连接数
stats
获取slab信息,那么什么是slab Memory is allocated in chunks internally and constantly reused. Since memory is broken into different size slabs, you do waste memory if your items do not fit perfectly into the slab the server chooses to put it in. Memcached会根据你数据的大小来存放不同的slab,可以理解为片或分区,这样不会浪费内存。
stats slabs
获取条目信息
stats items
访问和删除数据
知道slab的概念和信息之后,可以使用如下命令访问slab
stats cachedump [slab ID] [number of items, 0 for all items]
如在ID=36的slab中有3个条目
stats cachedump 36 0
ITEM model1 [223301 b; 1383751902 s]
ITEM modelNodeid1 [223301 b; 1383751902 s]
ITEM id1 [223300 b; 1383751902 s]
END
获取id1
get id1
删除id1
delete id1
退出
quit 或 ctrl + ]
Command Description Example
get Reads a value get mykey set Set a key unconditionally set mykey 0 60 5 add Add a new key add newkey 0 60 5 replace Overwrite existing key replace key 0 60 5 append Append data to existing key append key 0 60 15 prepend Prepend data to existing key prepend key 0 60 15 incr Increments numerical key value by given number incr mykey 2 decr Decrements numerical key value by given number decr mykey 5 delete Deletes an existing key delete mykey flush_all Invalidate specific items immediately flush_all Invalidate all items in n seconds flush_all 900 stats Prints general statistics stats Prints memory statistics stats slabs Prints memory statistics stats malloc Print higher level allocation statistics stats items stats detail stats sizes Resets statistics stats reset version Prints server version. version verbosity Increases log level verbosity quit Terminate telnet session quit 参考: http://www.alphadevx.com/a/90-Accessing-Memcached-from-the-command-line
-
tcpdump使用方法
tcpdump是linux命令行下常用的的一个抓包工具,抓包的目的是分析问题。
tcpdump -i eth0 -nn 监听eth0,-nn表示以ip和port方式显示包,不将ip转为主机名,这种在装B的时候可以刷屏,意义不大
所以要实现更精细化的抓包还是需要加更多的参数,使用man tcpdump | less -Ip examples可以查看手册中的例子。以下是常用的例子
查看所有网卡
tcpdump -D
抓取具体协议的包
tcpdump -i eth0 -nn 'udp'
tcpdump -i eth0 -nn 'tcp'
tcpdump -i eth0 -nn 'icmp'
抓取192.168.1.233的包
tcpdump -i eth0 -nn 'host 192.168.1.233'
抓取从192.168.1.233发送的包
tcpdump -i eth0 -nn 'src host 192.168.1.233'
抓取发送到192.168.1.233的包
tcpdump -i eth0 -nn 'src host 192.168.1.233'
多种参数用and连接,如
tcpdump -i eth0 -nn 'tcp port 80 and host 192.168.1.233'
使用tcpdump截取HTTP包会很方便
tcpdump 过滤 HTTP GET
tcpdump -s 0 -A 'tcp[((tcp[12:1] & 0xf0) >> 2):4] = 0x47455420'
tcpdump 过滤 HTTP POST
tcpdump -s 0 -A 'tcp dst port 80 and (tcp[((tcp[12:1] & 0xf0) >> 2):4] = 0x504f5354)'
tcpdump -e 显示以太网数据帧
tcpdump -v 显示进行的分组交换
tcpdump 查看 http 响应全部报文
tcpdump -A -vvvv -s 9999 -i eth0 port 80查看HTTP的请求和反回头和内容,详见https://sites.google.com/site/jimmyxu101/testing/use-tcpdump-to-monitor-http-traffic
tcpdump -A -s 0 'tcp port 80 and (((ip[2:2] - ((ip[0]&0xf)<<2)) - ((tcp[12]&0xf0)>>2)) != 0)'
tcpdump -X -s 0 'tcp port 80 and (((ip[2:2] - ((ip[0]&0xf)<<2)) - ((tcp[12]&0xf0)>>2)) != 0)'
1. To monitor HTTP traffic including request and response headers and message body:
tcpdump -A -s 0 ‘tcp port 80 and (((ip[2:2] – ((ip[0]&0xf)<<2)) – ((tcp[12]&0xf0)>>2)) != 0)’
2. To monitor HTTP traffic including request and response headers and message body from a particular source:
tcpdump -A -s 0 ‘src example.com and tcp port 80 and (((ip[2:2] – ((ip[0]&0xf)<<2)) – ((tcp[12]&0xf0)>>2)) != 0)’
3. To monitor HTTP traffic including request and response headers and message body from local host to local host:
tcpdump -A -s 0 ‘tcp port 80 and (((ip[2:2] – ((ip[0]&0xf)<<2)) – ((tcp[12]&0xf0)>>2)) != 0)’ -i lo
4. To only include HTTP requests, modify “tcp port 80” to “tcp dst port 80” in above commands
5. Capture TCP packets from local host to local host
tcpdump -i lo
tcpdump flag解读
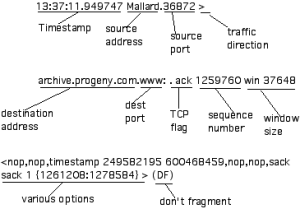
TCP Flag Flag in tcpdump Flag Meaning SYN s Syn packet, a session establishment request. The first part of any TCP connection. ACK ack Ack packet, used to acknowledge the receipt of data from the sender. May appear in conjunction with other flags. FIN f Finish flag, used to indicate the sender’s intention to terminate the connection to the receiving host. RESET r Indicates the sender’s intention to immediately abort the existing connection. PUSH p Signals the immediate push of data from the sending host to the receiving host. For interactive applications such as telnet, the main issue is the quickest response time, which this “push” flag signals. URGENT urg Urgent data should take precedence over other data. For example, a Ctrl-C to terminate a FTP download. Placeholder 0 If the connection does not have a syn, finish, reset, or push flag set, this placefolder flag will be found after the destination port. Note that it also appears in conjunction with the ack flag. tcpdump读出来的信息可以保存方便查看和分析
保存pcap信息,可以用WireShark来查看tcpdump -i vmbr1 -nn -vv -tttt -s 65535 -w tcpdump.pcap
如果担心文件过大可以加 -C 跟数字,当文件达到这个值(MB)之后,会新生成tcpdump.pcap.2
抓取 sql 语句
tcpdump -i bond0 -s 0 -l -w -  | strings | perl -e '
while(<>) { chomp; next if /^[^ ]+[ ]*$/;
    if(/^(SELECT|UPDATE|DELETE|INSERT|SET|COMMIT|ROLLBACK|CREATE|DROP|ALTER|CALL)/i)
    {
        if (defined $q) { print "$q\n"; }
        $q=$_;
    } else {
        $_ =~ s/^[ \t]+//; $q.=" $_";
    }
}'
查看保存文件的格式
# file tcpdump.pcap
tcpdump.pcap: tcpdump capture file (little-endian) - version 2.4 (Ethernet, capture length 65535)
对于保存的文件可以用-r读取,相当于对之前的抓取的过程进行回放。
tcpdump -ttttnnr tcpdump.pcap
tcpdump -qns 0 -X -r tcpdump.pcap
tcpdump -e -r tcpdump.pcap
wireshark filter
重传
tcp.analysis.retransmission
过滤 tcp stream
tcp.stream eq 1
-
column命令
想要使文本以整齐的tab表示,可以使用column -t命令
例子:
[mysqld_multi]
mysqld = /usr/local/mysql/bin/mysqld_safe
mysqladmin = /usr/local/mysql/bin/mysqladmin
user = root
log = /var/log/mysqld_multi.log

[mysqld3306]
port = 3306
socket = /tmp/mysql3306.sock
pid-file = /var/run/mysql/mysql3306.pid
datadir = /data/innodb
user = mysql
写入到my.test.cnf中
运行
column -t my.test.cnf
变成了
[mysqld_multi]
mysqld          =  /usr/local/mysql/bin/mysqld_safe
mysqladmin      =  /usr/local/mysql/bin/mysqladmin
user            =  root
log             =  /var/log/mysqld_multi.log
[mysqld3306]
port            =  3306
socket          =  /tmp/mysql3306.sock
pid-file        =  /var/run/mysql/mysql3306.pid
datadir         =  /data/innodb
user            =  mysql
-
MySQL/MariaDB单机多实例配置
在同一台服务器上可以配置mysql多实例,提高服务器的使用率
这里mysql的目录为/usr/local/mysql/,开两个实例,存放目录分别为
/data/db1
/data/db2
分别监听3306, 3307
接下来写好/etc/my.cnf内容,主要注意sock, pid, log
[mysqld_multi]
mysqld = /usr/local/mysql/bin/mysqld_safe
mysqladmin = /usr/local/mysql/bin/mysqladmin
user = root
log = /var/log/mysqld_multi.log

[mysqld3306]
port = 3306
socket = /tmp/mysql3306.sock
pid-file = /var/run/mysql/mysql3306.pid
datadir = /data/innodb
user=mysql
log-error=/var/log/mysql_error3306.log
default-storage-engine = INNODB
innodb_read_io_threads = 16
innodb_write_io_threads = 4
innodb_io_capacity = 4000
back_log = 50
max_connections = 2000
max_prepared_stmt_count=500000
max_connect_errors = 10
table_open_cache = 2048
max_allowed_packet = 16M
binlog_cache_size = 16M
max_heap_table_size = 64M
sort_buffer_size = 4M
join_buffer_size = 4M
thread_cache_size = 1000
query_cache_size = 0
query_cache_type = 0
thread_stack = 192K
tmp_table_size = 64M
server-id = 10
key_buffer_size = 8M
read_buffer_size = 1M
read_rnd_buffer_size = 4M
bulk_insert_buffer_size = 8M
myisam_sort_buffer_size = 8M
myisam_max_sort_file_size = 10G
myisam_repair_threads = 1
myisam_recover

[mysqld3307]
port = 3307
socket = /tmp/mysql3307.sock
pid-file = /var/run/mysql/mysql-3307.pid
datadir = /data/tokudb
user=mysql
log-error=/var/log/mysql_error3307.log
back_log = 50
max_connections = 2000
max_prepared_stmt_count=500000
max_connect_errors = 10
table_open_cache = 2048
max_allowed_packet = 16M
binlog_cache_size = 16M
max_heap_table_size = 64M
sort_buffer_size = 4M
join_buffer_size = 4M
thread_cache_size = 1000
query_cache_size = 0
query_cache_type = 0
ft_min_word_len = 4
thread_stack = 192K
tmp_table_size = 64M
server-id = 10
key_buffer_size = 8M
read_buffer_size = 1M
read_rnd_buffer_size = 4M
bulk_insert_buffer_size = 8M
myisam_sort_buffer_size = 8M
myisam_max_sort_file_size = 10G
myisam_repair_threads = 1
myisam_recover
安装数据文件
cd /usr/local/mysql/
./scripts/mysql_install_db --datadir=/data/db1/ --user=mysql
./scripts/mysql_install_db --datadir=/data/db2/ --user=mysql
创建启动脚本
cp /usr/local/mysql/support-files/mysqld_multi.server /etc/init.d/mysqld_multi
chmod u+x /etc/init.d/mysqld_multi
为方便使用,将/usr/local/mysql/bin加入到PATH中
export PATH=/usr/local/mysql/bin:$PATH
启动实例
/etc/init.d/mysqld_multi start 3306
/etc/init.d/mysqld_multi start 3307
查看启动的情况
netstat -tnlp