把需要改权限为777的目录写到test.txt里
每行一个
然后在chmod.sh里加入如下内容
#!bin/bash
while read LINE
do
 chmod 777 $LINE
done < $1
执行
bash chmod.sh test.txt
把需要改权限为777的目录写到test.txt里
每行一个
然后在chmod.sh里加入如下内容
#!bin/bash while read LINE do chmod 777 $LINE done < $1
执行
bash chmod.sh test.txt
github使用ssh认证,说白了就是认证关系,以前电脑A(笔记本ubuntu)的~/.ssh/id_rsa下有私钥,github上填写好了公钥内容id_rsa.pub,认证关系打通了。
私钥要保护好,公钥随便用。公钥就好比你家大门,私钥是钥匙,大门可以随便给人看到,但钥匙不能给人随便用。私钥的默认名字是id_rsa,它的权限是600。
现在如果换电脑B(如vps),也是用linux,那么现在有两种方法,
步骤如下:
cp A上~/.ssh/id_rsa 到B上 ~/.ssh/id_rsa.github,并把权限改为600
在B上创建~/.ssh/config,写入以下内容,保存退出。
它声名了目标主机是github.com,用户git,认证方式和文件,
PS:为方便连接其他主机时也可用这种方法,在同一机器上连接多个github账号也可使用这种方法。http://rsylareclipse.blog.163.com/blog/static/18550144020121285148377/
Host github.com
 User git
 Hostname github.com
 PreferredAuthentications publickey
 IdentityFile ~/.ssh/id_rsa.github
测试下能成功
jpuyy@www:~/.ssh$ ssh -T [email protected]
 Hi jpuyy! You've successfully authenticated, but GitHub does not provide shell access.
这和在A上第一次使用时方法一样,但为了不使用默认名id_rsa,可用如下命令
ssh-keygen -C "[email protected]" -f ~/.ssh/id_rsa.github
这时把id_rsa.github.pub的内容copy到对应github.com的ssh公钥里
ubuntu下安装git
sudo apt-get install git git-core
或者到新立得软件包里面 输入 git 安装。
在本地使用git
git init
git add .
git commit -m 'project init'
在库的目录下
git add .     #存储到本地
git commit -m 'message'    #存储时的标记(message是说明文字)
git pull   #下载服务器代码
git push   #上传代码至github
只检出最近一次提交的commit
git clone [email protected]:jpuyy/forge.jpuyy.com.git --depth=1
已经写了一些代码之后想要把代码放入到git库里,先放到本地,再推到bitbucket代码仓库里
cd /path/to/my/repo
git init
git add .
git commit -m 'project init'
git remote add origin ssh://[email protected]/jpuyy/nginx.conf.git
git push -u origin --all # pushes up the repo and its refs for the first time
git push -u origin --tags # pushes up any tags
git刚创建的库提交时提示
➜ jpuyy-shells git:(master) git push
No refs in common and none specified; doing nothing.
Perhaps you should specify a branch such as 'master'.
fatal: The remote end hung up unexpectedly
Everything up-to-date
需要创建一个master分支
➜ jpuyy-shells git:(master) git push --set-upstream origin master
Counting objects: 3, done.
Delta compression using up to 4 threads.
Compressing objects: 100% (2/2), done.
Writing objects: 100% (3/3), 408 bytes | 0 bytes/s, done.
Total 3 (delta 0), reused 0 (delta 0)
To [email protected]:jpuyy/jpuyy-shells.git
* [new branch] master -> master
Branch master set up to track remote branch master from origin.
在develop分支下获取master最新
git pull origin master
将Develop分支发布到Master分支的命令
# 切换到Master分支
git checkout master
# 对Develop分支进行合并
git merge --no-ff develop
git merge --ff-only develop
git clone github 库
git clone https://[email protected]/username/repo_name .
git相关的一些命令
git-add . 只是刷新了git的跟踪信息,其实并没有提交到 git 的内容跟踪范畴之内
git-status 我们能看到 git 的状态提示
git-init-db 初始化git数据库
git-add hello.c 添加文件
git-log 查看修改、提交记录
git-branch bb 创建分支
git-branch 查看分支
git-checkout bb 切换工作分支
设置提交的用户名和邮箱
git config --global user.name "jpuyy"
git config --global user.email "[email protected]"
查看git log的时候,显示高亮
git config --local color.ui true
获取当前config的信息
git config --list
git使用http代理
git config --global http.proxy 'socks5://127.0.0.1:1080'
git config 的配置可以调用默认编辑器 vim 编辑
git config --global -e
git-mv roredu.c helight.c 修改文件名
单独恢复一个文件为版本库最新状态
git checkout -- config/index.js
使用git rm 删除文件
git rm file1.txt
git commit -m “remove file1.txt”
拷大文件会段开
tail -20 /var/log/messages
解决办法如下:
在smb.conf中对应位置加入,默认的load printers = yes,注意不要加错位置
load printers = no
printing = bsd
printcap name = /dev/null
disable spoolss = yes
说明:
When would you set the global parameter disable spoolss?
Setting this parameter to Yes disables Samba’s support for the SPOOLSS set of MS-RPCs and yields behavior identical to Samba 2.0.x. Windows NT/2000 clients can downgrade to using LanMan style printing commands. Windows 9x/Me are unaffected by the parameter. However, this disables the ability to upload printer drivers to a Samba server via the Windows NT/200x Add Printer Wizard or by using the NT printer properties dialog window. It also disables the capability of Windows NT/200x clients to download print drivers from the Samba host on demand. Be extremely careful about setting this parameter.
The alternate parameter use client driver applies only to Windows NT/200x clients. It has no effect on Windows 95/98/Me clients. When serving a printer to Windows NT/200x clients without first installing a valid printer driver on the Samba host, the client is required to install a local printer driver. From this point on, the client treats the printer as a local printer and not a network printer connection. This is much the same behavior that occurs when disable spoolss = yes.
Under normal circumstances, the NT/200x client attempts to open the network printer using MS-RPC. Because the client considers the printer to be local, it attempts to issue the OpenPrinterEx() call requesting access rights associated with the logged on user. If the user possesses local administrator rights but not root privilege on the Samba host (often the case), the OpenPrinterEx() call fails. The result is that the client now displays an “Access Denied; Unable to connect” message in the printer queue window (even though jobs may be printed successfully). This parameter MUST not be enabled on a print share that has a valid print driver installed on the Samba server
需求:可用浏览器打开svn查看,但使用tortoise提交需要认证
管理员安装
yum install mod_dav_svn subversion
在/etc/httpd/conf.d/subversion.conf添加
<Location /svn>
 DAV svn
 SVNParentPath /var/www/svn
 SVNListParentPath on
 AuthType Basic
 AuthName "Subversion repositories"
 AuthUserFile /etc/svn-auth-users
 <LimitExcept GET PROPFIND OPTIONS REPORT>
 Require valid-user
 </LimitExcept>
</Location>
上面的意思是都可以在浏览器里看到,但是svn提交需要认证
添加svn认证用户
## Create testuser ##
htpasswd -cm /etc/svn-auth-users testuser
New password:
Re-type new password:
Adding password for user testuser
添加一个svn库
mkdir /var/www/svn
cd /var/www/svn

svnadmin create testrepo
chown -R apache.apache testrepo

chcon -R -t httpd_sys_content_t /var/www/svn/testrepo

## Following enables commits over http ##
chcon -R -t httpd_sys_rw_content_t /var/www/svn/testrepo
重启apache
/etc/init.d/httpd restart
这样打开浏览器就直接看到库的内容,而如果提交还需要认证。
PS:如果全程认证,则把subversion.conf的Require valid-user从LimitExcept拿出来,并把LimitExcept去掉。
从上述过程可以发现,svnserve一直没有开,用到的协议是http,如果用svn来控制权限,则是另外一回事了。
在windows7下用l2tp连接时,在选好配置
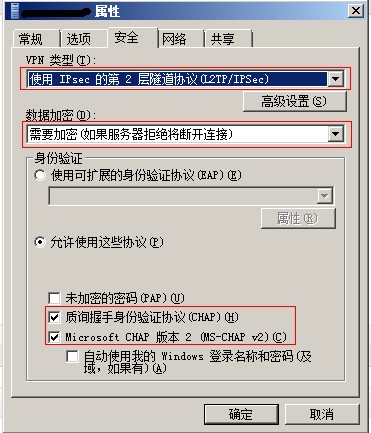
连接错误789,如图:

按下面的方法保存.reg文件,双击导入,重启电脑后可以连接
Windows Registry Editor Version 5.00
[HKEY_LOCAL_MACHINE\SYSTEM\CurrentControlSet\Services\RasMan\Parameters]
"Medias"=hex(7):72,00,61,00,73,00,74,00,61,00,70,00,69,00,00,00,00,00
"ServiceDll"=hex(2):25,00,53,00,79,00,73,00,74,00,65,00,6d,00,52,00,6f,00,6f,\
 00,74,00,25,00,5c,00,53,00,79,00,73,00,74,00,65,00,6d,00,33,00,32,00,5c,00,\
 72,00,61,00,73,00,6d,00,61,00,6e,00,73,00,2e,00,64,00,6c,00,6c,00,00,00
"IpOutLowWatermark"=dword:00000001
"IpOutHighWatermark"=dword:00000005
"ProhibitIpSec"=dword:00000001
[HKEY_LOCAL_MACHINE\SYSTEM\CurrentControlSet\Services\RasMan\Parameters\Quarantine]
"Enabled"=dword:00000001
"AutoRefreshEnabled"=dword:00000000
"AutoRefreshTimeout"=dword:01808580
"WorkItemTimeout"=dword:00000bb8
上面的东西如ihipop所说,windows中l2tp与ipsec是一起的,上面的注册表将ipsec的保护给去掉了,显然不能满足要求。
仔细检查,是/etc/ipsec.conf中left=127.0.0.1,这是不行的,需要换成公网ip。
对应的,在/etc/ipsec.secrets中也将对应的127.0.0.1换成公网ip。
配置方法参考:http://www.cnblogs.com/klobohyz/archive/2012/02/04/2338057.html